
-
Highlight
510mm Working Width Concrete Surface Grinder
,1500rpm Concrete Surface Grinder
,510mm Working Width Concrete Floor Grinder
-
Grinding Head12 Heads
-
Inverter10HP
-
Water Tank30L
-
FunctionTerrazzo, Concrete, Marble, Granite
-
Motor10HP
-
Rotating Speed0-1500rpm
-
Working Width510mm
-
Place of OriginCHINA
-
Brand NameMERROCK
-
CertificationCE, ISO9001,etc.
-
Model NumberV12-510
-
Minimum Order Quantity1pc
-
Priceupon request
-
Packaging DetailsIron frame+carton, Export wooden box
-
Delivery Time9
-
Payment TermsL/C, D/A, D/P, T/T
-
Supply Ability150 sets/month
0 - 1500rpm 510mm Working Width Concrete Surface Grinder
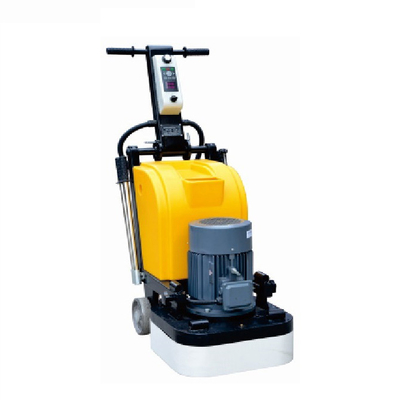

Concrete Surface Grinder 510MM Working Width 12 Heads
Feature:
1. Aluminum die-casting gear box
2. Global well-known brands motor and inverter
3. External vacuum port
4. Components through precision lathe processing
5. With emergency stop button and reverse button on panel
6. Multifunctional grinding discs can be fixed various polishing pads to reduce the cost
Parameters:
| Item | Data |
| Model | V12-580 |
| Voltage | 380V |
| Motor | 10HP |
| Inverter | 10HP |
| Speed | 0-1500rpm |
| Work width | 580*580mm |
| Water tank | 30L |
| Heads | 12pcs |
| Weight | 280kgs |
Application & Function:
- Core component is made by imported mould,ensuring the performance and stability of product.
- Strong power, large working area, high efficiency, low in cost(save 20% material consumption).
- The necessary top brand equipment for large area project and ideal choice for strength construction cooperation.
- Separable add weight makes the machine easy for transport. V12 is your best choice to save time, save worry and save money in condition of lacking in technician, raising wage of labors at present.
- With a vacuum outlet for double vacuum dust device. It is available for both wet and dry grinding.
- V12-510 is a cost-effective, economic and practical type, the motor is also selected the world top three brands -WEG motor or Siemens electric motor.
![]()
Tips:
PREPARING TO POLISH CONCRETE: GRIND, GROUT, & DYE
Polishing Your Concrete Slab
Once the epoxy and marble coating is dry after about 18 hours, we recommend beginning the grinding process again with a 70 grit pad followed by a 100 grit copper pad to eliminate any excess and begin the refining process.
At this point, we highly recommend using a concrete densifier to make the slab denser and improve the impact and abrasion resistance of the slab. This will improve longevity and minimize damage over time.
Then, we follow the following pattern of polishing:
200 grit copper for wet grinding to remove the scratch pattern and act as the “bridge” to dry polishing;
400 grit dry polish;
800 grit dry polish;
1800 grit dry polish;
By this point you should see a lovely sheen to the slab, and at this point you can apply your concrete dye. Dye is purely aesthetic and allows you to get creative with the look of your concrete slab. You can do one simple color or create patterns – it’s purely the preference of you or your client.
After applying the water-based dye, we use a 3500 grit resin pad to remove any swirl patterns left by the tooling and add additional clarity and shine to the floor. After this step, you’re ready to apply any urethane or sealant to the floor and congratulate yourself on a job done right.
Our products are sold all over the world, you can rest assured.